Участник:SpaceSmithers/guide sandbox: различия между версиями
imported>SpaceSmithers м (reply to san) |
imported>SpaceSmithers (General work and polish, and preparations for some future changes.) |
||
| Строка 295: | Строка 295: | ||
*<code>height</code>: The size of covered area, parallel to dir. | *<code>height</code>: The size of covered area, parallel to dir. | ||
*<code>width</code>: The size of covered area, perpendicular to dir. | *<code>width</code>: The size of covered area, perpendicular to dir. | ||
*<code>dheight</code>: Distance in height from the (0,0) bounding box to the dock. [[#Dwidth_and_Dheight_in_more_depth|More details can be found here]]. | |||
*<code>dheight</code>: Distance in height from the (0,0) bounding box to the dock. | *<code>dwidth</code>: Distance in width from the (0,0) bounding box to the dock. [[#Dwidth_and_Dheight_in_more_depth|More details can be found here]]. | ||
*<code>dwidth</code>: Distance in width from the (0,0) bounding box to the dock. | *<code>name</code>: A name string for the port. This name will be visible on shuttle consoles, Shuttle-Manipulator admin verb, and during debugging. | ||
*<code>name</code>: A name string for the port. This name will be visible on shuttle consoles | *<code>roundstart_template</code>: A template that will spawn on this port when the map initializes. Used on docks for arrivals, escape pods, and more. | ||
*<code>shuttle_id</code> (formerly <code>id</code>): Identification variable. Mandatory for certain ports. | *<code>shuttle_id</code> (formerly <code>id</code>): Identification variable. Mandatory for certain ports. | ||
**'''IMPORTANT:''' | **'''IMPORTANT:''' For standard stations, you MUST use these '''exact''' strings for the listed areas, or else they will not function. <span style=background-color:yellow;">Stub? double-check all instances of shuttle_id in case i missed some.</span> | ||
***Arrivals dock: <code>"arrival_stationary"</code> | ***Arrivals dock: <code>"arrival_stationary"</code> | ||
***On-station dock for centcom ferry: <code>"ferry_home"</code> | ***On-station dock for centcom ferry: <code>"ferry_home"</code> | ||
| Строка 307: | Строка 307: | ||
***On-station Whiteship dock: <code>"whiteship_home"</code> | ***On-station Whiteship dock: <code>"whiteship_home"</code> | ||
***Auxiliary Base Construction: <code>"aux_base_zone"</code> | ***Auxiliary Base Construction: <code>"aux_base_zone"</code> | ||
A stationary port is strict with its width and height variables when deciding if a shuttle can dock there. They should generally be greater than or equal to the dimensions of the shuttle that wants to dock. If a shuttle is larger than the stationary port's dimensions, it will outright refuse to dock. When testing your map, debug/admin tools such as the <code>Shuttle-Manipulator</code> verb will be a tremendous asset. | |||
A stationary port | |||
The labor shuttle, mining shuttle, public mining shuttle, and the auxiliary base zone each have their own, unique | The stationary ports for the labor shuttle, mining shuttle, public mining shuttle, and the auxiliary base zone each have their own, unique subtypes. These are presets and should not be edited, except for their direction. | ||
< | '''Escape pods''' utilize two different stationary ports for each pod; one is a standard docking port with the <code>roundstart_template</code> to spawn the pod, and another that uses a unique subtype of stationary ports, <code>/obj/docking_port/stationary/random</code>. When the map initializes, the random ports are automatically teleported to a random spot in lavaland (or the icemoon if using the respective icemoon subtype). These spots are reserved for emergency pod launches when the station is on red or delta alert levels. Random ports need a <code>shuttle_id</code> for pods to dock, and generally use the following naming scheme: "pod_lavaland", "pod_2_lavaland", "pod_3_lavaland", and so on. Note that the non-random stationary ports that stay on-station do not have a <code>shuttle_id</code> set, and therefore do not accept return trips after the pod departs. | ||
Most stationary ports, except for the arrivals shuttle, generally face the shuttle or face away from the thing the shuttle docks with. If you're unsure where to place the docks, its always a good idea to use another pre-existing map as a reference. Also remember that mobile ports park '''directly on top of''' stationary ports and will also rotate to adopt their dir. | |||
===Mobile Ports=== | ===Mobile Ports=== | ||
The mobile port variables are quite different from their stationary counterpart. Lets go through the variables: | The mobile port variables are quite different from their stationary counterpart. Lets go through the variables: | ||
*The <code>width</code>, <code>height</code>, <code>dwidth</code>, and <code>dheight</code> are all generated '''automatically''', and should not be manually edited in. | *The <code>width</code>, <code>height</code>, <code>dwidth</code>, and <code>dheight</code> are all generated '''automatically''', and should not be manually edited in. | ||
*<code>name</code>: Name your spacecraft! Will be printed in consoles | *<code>name</code>: Name your spacecraft! Will be printed in consoles and also station-wide announcements if its an escape shuttle. | ||
*<code>preferred_direction</code>: The direction the shuttle appears to travel in. Changes the parallax animation. | *<code>preferred_direction</code>: The direction the shuttle appears to travel in. Changes the parallax animation. | ||
*<code>port_direction</code>: | *<code>port_direction</code>: Relative direction of the docking port from the front of the shuttle. If you rotate the ship so that it points north, what direction will the mobile port be facing? | ||
You should cover your entire shuttle with one or more proper subtypes of <code>/area/shuttle</code>, especially if its an escape shuttle with a brig on it. This ensures that everything works and moves properly. Otherwise, your shuttle may encounter unwanted errors or claim turfs within the bounding box that shouldn't be moving with your shuttle. | |||
Some shuttles should be using specialized subtypes of the mobile docking port, like arrivals and emergency shuttles. Be sure to check these subtypes before settling with the generic one, or else they may not work as expected. | |||
===Dwidth and Dheight in more depth=== | ===Dwidth and Dheight in more depth=== | ||
<br><span style=background-color:yellow;">In progress, a mix of old and new. Todo: Re-write section, create a better visual 2x2 table diagram displaying all 4 directions. Focus more on the generic diagram and turn the metastation blurb into a shorter example piece.</span> | |||
dwidth/dheight is the offset of the docking_port obj from the (0,0) bounding box corner. In dir == 1 (north) 0,0 is the bottom left corner? This changes for each direction, For example when dir is 2 it's the upper right corner. so dwidth and dheight identify where the bounding box starts relative to the docking port obj whereaswidth and height determine the actual width and height of the bounding box | dwidth/dheight is the offset of the docking_port obj from the (0,0) bounding box corner. In dir == 1 (north) 0,0 is the bottom left corner? This changes for each direction, For example when dir is 2 it's the upper right corner. so dwidth and dheight identify where the bounding box starts relative to the docking port obj whereaswidth and height determine the actual width and height of the bounding box | ||
<br>'''Note: We count step 0 as a tile, so a height and width of 9 is actually 10 tiles (tile 0 to tile 9)''' | <br>'''Note: We count step 0 as a tile, so a height and width of 9 is actually 10 tiles (tile 0 to tile 9)''' | ||
Here is an example for the north facing shuttle dock direction - you can rotate this image to determine where the offset is for each other cardinal direction | |||
[[File:ShuttleBox.png]] | |||
{| | |||
[[File: | |[[File:metastation_arrivals_dock.png|thumb|right|Metastation's Arrival Dock.]] | ||
| Lets take a look at Metastation's arrivals dock. You can see the area it covers with its width and height variables. Please note that since the port is rotated to the west, width, height, and even the origin point (0,0) are all rotated as well. In the image, you can see how dwidth is measured from the (0,0) tile. The dheight variable goes unedited in this case, because the dock is 0 tiles away height-wise relative to the (0,0) point, and the default value is already 0. | |||
|} | |||
| | |||
==<s>Other files</s>== | ==<s>Other files</s>== | ||
| Строка 367: | Строка 350: | ||
{{Speech | {{Speech | ||
|name=SpaceSmithers | |name=SpaceSmithers | ||
|text=I'll look more into it after im done the shuttle section. | |text=I'll look more into it after im done the shuttle section. Update 11/17: They appear to be mandatory for multiz maps (as described below, actually), and I think the map rotation config relies on these existing, but not 100% sure on that. | ||
|image=[[File:spell.png|64px|right]] | |image=[[File:spell.png|64px|right]] | ||
}} | }} | ||
Версия от 13:17, 17 ноября 2022

|
This page is currently under construction!
The following page is currently in the process of being created, is undergoing a major structural rework and/or is being moved. |
Other related guides: Understanding SS13 code, SS13 for experienced programmers, Guide to door access and Map Merger
| Файл:Notice.png | Read this!
This page is mostly port of san7890's A-Z Guide to Mapping, a HackMD document that details the mapping essentials. It is recommended that you read that document first as it is well organized, updated, and contains very useful visuals that this page may lack. If you are an experienced mapper, san7890's Mapping Reference Collection may be more useful to you. |
 |
Big Chungus говорит: "Nyehehehehe I'm Big Chungus (big chungus voice). I just went through some stuff and left some comments. If you want something nice to write about the Guide to Mapping (and the Mapping Reference Collection) in those above chat bubbles, I like Goonstation ZeWaka's Prompt (inspired probably by san7890's own words), which can be found here: https://hackmd.io/@goonstation/maps#Goonstation-Mapping-Guide ." |
Getting Set Up
Setting up before doing anything is crucial to having a smooth and painless mapping experience.
Mapper's Checklist
Listed below is the software we'll be using:
- Git (Windows)
- Github Desktop (and a GitHub Account)
- You may substitute this for any Git client that you know how to use already (Bash or GitKraken). If you do not know how to use any Git client, Github Desktop remains a perfectly acceptable client for mapping changes, and I will be using it throughout this guide.
- StrongDMM Map Editor (available for Windows, Linux, and MacOS)
- If you prefer to use a web-based utility, you may use FastDMM2. Never, ever use Dream Maker to map. You will only harm yourself.
- Visual Studio Code with the Goonstation Extension Pack
- This is recommended because you will need to test your mapping changes! In the words of MMMiracles (creator of Cere, Donut, and Tram): “Knowing how to code greatly expands your mapping horizons.” You will not need to know how to code in order to map but having this set up at the very start will greatly assist your future endeavors!
- We use the Goonstation Extension Pack for easy interaction with BYOND’s Dream Maker code, it is a must-have. Don’t fret the name (because /tg/ coders made most of the stuff anyways haha).
- Python
- This is needed for Git Hooks, which are important in your mapping endeavors.
- Love
It is imperative that you use the Map Merger tools before committing any changes to a map. See here for how. Some modern programs do similar functions to what Map Merger does, but running this and getting your Git Hooks set up save you a lot of headache.
Forking the Repository
Firstly, you need a fork. A fork will be your very own copy of our repository, free do with as you wish! Just hit the "Fork" button on https://github.com/tgstation/tgstation. Feel free to be creative with the name of your fork. Displayed should be "(GitHub username)/(name of fork), forked from tgstation/tgstation",It should look something like this:  .
.
Within your fork, you'll want to click the "Code" button, then click "Open with GitHub Desktop"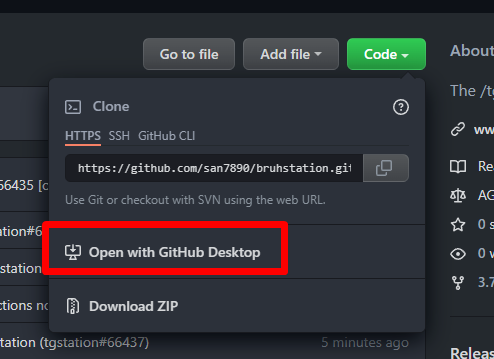 (assuming you've downloaded it) under the dropdown. A prompt from the application will open; find a clean folder to locally copy your repository and click Clone. This may take a few minutes. Another prompt will appear asking: "How are you planning to use this fork?" You will want to select "To contribute to the parent project". This will make creating Pull Requests easier.
Branching the Fork
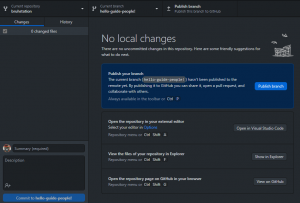
The final part to setting up GitHub is to make a new branch. This part is super-duper important, because you want to keep your “master” branch on your fork as clean as possible, since it’s a pain to clean out and send pull requests to.
To do this, click on the Current branch (which defaults to "master") and click on the "New branch" button next to the filter bar . For every individual project you work on and submit a Pull Request for, you want to be on a brand new branch. Feel free to name it whatever you want, can be as goofy or as organizational as you want. It’s your fork, after all.
- You may also get a screen that says “base it off the current branch” or “base it off the upstream/master”. That depends on what you want, but if you want to start fresh on a new project, always hit “base it off the upstream/master”.
Mapping: San7890's Guide to StrongDMM
Preamble
In the time of Metacide, the creator of MetaStation and the last person to make a "Guide to Mapping", all that you had was Dream Maker's program. Dream Maker sucks though, and we have better tools. While all of the content you see on the rest of this page and elsewhere may be lifted straight from DreamMaker, this will serve as a small "pointer" to where you can find that same functionality in StrongDMM. Everything you can do in Dream Maker, you can do about 100 times better in StrongDMM. If you've managed to grasp the bare essentials of even playing Space Station 13, then I have no doubt that getting acclimated to StrongDMM will probably be a walk-in-the-park. However, BYOND hasn't changed in how it parses maps, so that will all hold steadfast and true.
At the time of me writing this guide, StrongDMM is currently in an “alpha state” (Versions 2.0.0 and up). I will be using the alpha version since it’s the path the program is going to take in the future, but if you’re hesitant about an alpha version, feel free to downgrade to Version 1.9.1 (it has a few features 2.0.0 is missing). You can actually run both concurrently, too! Regardless, let’s start mapping!
Starting StrongDMM
Go into "File" in the top-right of your screen and hit “Open Environment”. The “environment” is how StrongDMM is able to find, collect, and parse the atoms that make up every part of every map. This is an important step, and make sure you always use the .DME (Dream Maker Environment) file on your repository to keep things as straightforward as possible. Just get tgstation.dme.
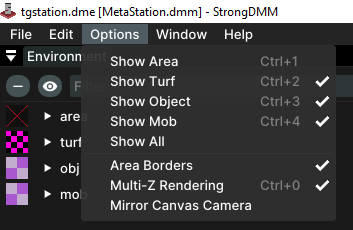
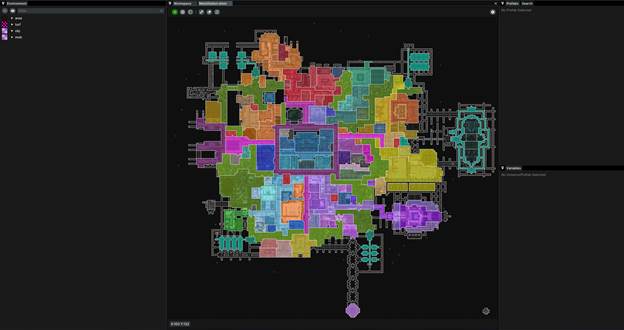
Beautiful! Let’s talk about those colors. Those are areas which are important for the game to understand what discrete location is what, and we use it for several things code-side. For example, the bridge is a different area than the bar, so you want to make sure everything is defined appropriately. They tend to be a bit distracting through, so you can hit Ctrl+1 to get rid of those. Do make sure you define them properly when you’re done, though.
Areas are one of four different, distinct “layers” we use in BYOND. The other three are turfs, objs (for Objects), and mob (for creatures/animals/what-have-you). Their progenitor species is the atom. You can go into the options tab or hit the respective keybind to quickly filter for those.
Editing
Testing Your Map
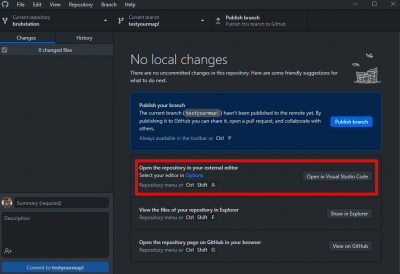
You should always test your code, test your maps, test your sprites, test everything whenever it’s a non-trivial amount of work. There’s an incredibly simple way to do this, which I’ll reveal to you now:
The easiest/fastest way to do this is to go into Github Desktop and find the button that reads “Open in Visual Studio Code”. If it doesn’t, set your default editor to Visual Studio Code.
Once inside Visual Studio Code, you'll want to hit Ctrl+F5, or just F5. This will start compiling your code, which shouldn’t take more than a few minutes. Once done, it’ll boot up BYOND’s Dream Seeker, connect you to the local server, and automatically give you the highest permissions. This is because you’re doing everything in the debugging mode, which is quite nifty. This is arguably the simplest way to do it.
Once Space Station 13 has started, the Server tab located in the Stat-Panel will be a big help. From there, you can change maps and also skip the post-initialization wait time by clicking Start Now (or just type Start-Now in the command bar). Observe as a ghost and view your changes. Compiling is a good way to view the more subtle nuances that you weren’t able to pick up on through the editor. This includes (but is certainly not limited to): lighting, door accesses, mob interactions, and just figuring out if it looks good.
Simply follow these steps and you should be able to catch most errors mapping brings. The Pre-Commit Checklist, also provided in a dropdown below, best applies to outright Station Mapping and may not be applicable to ruins/away missions/shuttles/etc., but it’s still quite good to check as much as you can rather than assume that it works.
- Are floors with or without air, as they should be? (regular or airless)
- You can test this one out by looking for Active Turfs.
- Does the area have an APC?
- Does the area have an Air Alarm?
- Does the area have a Request Console?
- Not every area needs this, look at other stations.
- Does the area have lights?
- When you compile your map for testing, make sure the lighting is adequate. You don’t want any unwarranted “dark” spots in your rooms. If you’re going for “warm” or “cold” lighting, make sure it all matches.
- Does the area have a light switch?
- Only smaller rooms that get minimal traffic should recieve lightswitches. Areas like primary hallways should definitely not have them.
- Does the area have enough security cameras? (Use the Debug Verbs for help)
- Does the area have enough security cameras? (Use the verbs under Mapping for help)
- Does the area have enough intercoms? (The verb
Intercom Range Displayin the Mapping Debug Verbs helps with this.) - Is the area connected to the vent air loop (distro)?
- Is the area connected to the scrubber air loop (waste)?
- Is everything wired properly?
- Does the area have a fire alarm and firelocks?
- Typically, doors leading into maintenance do not need firelocks. Do not place firelocks on doors facing the exterior of the station (like space or the planet).
- Do all airlocks work properly?
- Are accesses set properly on doors, buttons, etc.?
- For typical airlocks, you can use the Airlock Mapping Helpers. Otherwise, consult the reference for Door Accesses.
 |
SpaceSmithers говорит: "I'm working on an Access Helper table which might help for this part. Also, I copied the checklist into a nifty dropdown seen above in the hackmd port." |
 |
Big Chungus говорит: "san7890 went through and documented all of the access helper define macros here: https://github.com/tgstation/tgstation/blob/master/code/__DEFINES/access.dm don't know how much that helps." |
 |
SpaceSmithers говорит: "Looks good. A much needed update, I think. Side note: Keycard Auth grants auto-connect ability on Holopads. Smithers' Niche Funfact #113." |
- Are all items placed properly?
- In summary, are your objects all on tables as needed? Are tables or other objects obscuring your vents/scrubbers?
- Does the disposal system work properly from all the disposal units in this room as well as the pipes of which pass through this room?
- Just throw yourself through a few disposals systems that seem to pass through the area you touched. Easy to forget.
- Check for any misplaced or stacked piece of pipe.
- /tg/station also lints for this to catch you if you forget.
- Check for any misplaced or stacked piece of wire.
- /tg/station also lints for this to catch you if you forget.
- Identify how hard it is to break into the area and where the weak points are and balance the area accordingly.
- Check if the area has too much empty space.
- You don’t want vast, bald spots in your rooms that serve little purpose. Fill it up with stuff if you can, or just trim the fat entirely. Whatever works best for the station and your design.
- Are there any indestructible turfs where they shouldn't be?
- In the Stat-Panel (mentioned previously), go into the
DebugTab. Now, select theMapping Verbs - Enableverb. - You should now have the
MappingTab. - Check for errors for cameras, power cables, and atmos pipes.
- Powersink the station and ghost around to check for unconnected powernets (APCs that aren’t discharging/charging).
- Ride disposals from start to finish to check for broken disposals.
- Make yourself an AI and check for blindspots in camera networks. You can also use the Camera Range Display Verb.
- Spawn yourself in (check Debugging Hottips)
Fix your errors, and run through this list again to double check, because chances are you missed something or you broke something else. That’s just how it is. Doing so will save everyone a lot of headaches down the line. Specifically, yours, because you will have to fix your own shit.
In mapping, there are a lot of errors that may come up during Initialization of the world. However, we do check for a lot of these errors. Here’s how you can check these out and get them ironed out before we have to catch it for you.
Assuming your world is already compiled, wait for Initialization to finish, and then type in this verb into your chat box Get-Current-Logs. You should see a pop-up with a whole list of logs. You just want to go down this list and select the option that says map_errors.log. Go ahead and either “View” or “Download” this log file (“Open” doesn’t typically work for me).
We also now do this check for you on every pull request for station maps through our GitHub Continuous Integration process. I would advise checking this for non-station maps, though.
Committing and Pulling
Return to GitHub and you'll see your modifications to the Map Keys in the line changes. In the bottom-left corner, you'll see the commit menu. Maintainers at /tg/ really do appreciate if you write out a thoughtful commit title and description, because you will need to justify your changes in one way or another when you submit it for review through the Pull Request Process!
Committing your changes
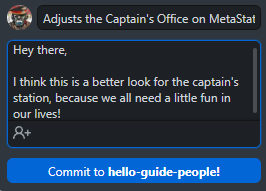
Once you've written the constructive title and brief description, hit "Commit to (your branch name here)”. If it says “Commit to Master/Main”, don’t hit that button because you’ll dirty the master branch of your forked repository. Make a new branch, and base it off what you’re currently on. If it doesn’t say that, everything’s just fine. Congratulations, you’ve “committed” your changes!
What if you didn’t like that, realize you made a typo, or just wanna go back? You can always just go back into StrongDMM to edit your map and make a new commit, but you can also go to the History tab, right-click on your commit, and click "Undo commit...", which will just undo your commit, and then you can make as many changes as you please, then recommit. This is one of the greatest advantages of Git, it has a powerful versioning system that you can easily use to hop from one day’s work to another.
If you’re happy, then seek out a "Publish branch" button. This will upload your branch to the remote (github.com).
Creating a Pull Request
Once all the "deltas are resolved" and what-not, a "Create Pull Request" button should appear on GitHub Desktop. Click that, and your web browser will open to GitHub. Ta-da, just fill in the template just like the descriptions in the contributing template say (including an image or two of your changes is always well appreciated), hit “Create Pull Request”, and wait for the feedback to roll through. I would advise viewing some example PRs, open up a few of them (if you haven’t already been tracking how people write Pull Requests) and try to learn well.
The /tg/ guidelines for Pull Requests can be found here. Another document with friendly advice from a coder can be found here.
You’ve done it! You’ve done mapping! I hope that wasn’t too painful, and the rest of this page (or the links below) will introduce you to some deeper contents that I briefly touched on in regards to mapping.
Closing Notes
While this guide is meant to contain the bare-bones of information to get people started on mapping, the Mapping Reference Collection will contain a wealth of information for mappers. I heavily recommend reading this.
Stumped? Feel free to ask some more experienced mappers any questions on the /tg/ forums or the Discord
End of san7890 guide port, now entering post-revision metacide guide
 |
SpaceSmithers говорит: "(9/8) Double-check for missing hyperlinks. Does it need more images?" |
 |
SpaceSmithers говорит: "(8/11) Regarding the articles below this bubble: I've slain a bunch of content that was crossed out and deemed totally useless. You can always check out an earlier revision to review the old info. The sections I did keep, however, I thought might have at least some merit. I will pick some out and refine them and/or add my comments, refining and incorporating them at the end. I also removed the pre-commit checklist as it was already listed above, let me know if you want that back down here in this section. Might even make it a template for Quick Ref?" |
The first step, then, is to be able to create your first few rooms. Select an open turf from the generic simulated floors, preferably /turf/open/iron. Each floor has a preset make-up of air on them, unless you use one titled "airless". Surround these floors with walls, and hey presto you have a room. Try sticking some tables in there, perhaps a vending machine or two.
If you want to add some chips to your new den but are unhappy with how they neatly stack on top of each other, you can adjust their "pixel_x" and "pixel_y" values with the Nudge and Dir menu. You can click & drag the values, use the mouse wheel on them, or double-click on them to enter exact values.
name variable. Other subtypes of APCs may include "unlocked" and "highcap". For testing, you might want to use a "highcap" variant that stores more energy, since we don't have a power source yet. Alternatively, you can change the "cell_type" variable to /obj/item/stock_parts/cell/infinite for infinite power (Source: i made it up. Double-check this, Smithers!). If there are no directional types for the APC you're using, you can use the Nudge and Dir menu from earlier to adjust it. In a normal power system, you'd connect the APC up to all the others and the station's generator via SMES cells, but we'll do that later. For now you have a basic room that is powered and starts with enough air to breathe happily. You can put an air canister in if you think you'll consume all the oxygen, or somesuch.
Important Note: There are nudge_x and nudge_y variables in the editor, as well as various z-axis variables. Don't ever change these, they're not used in SS13 and break things.(is this possible in strongDMM? nudge_x/y are displayed bottom right when selecting and obj anyhow..)
To be able to actually spawn into a room, you'll want to place spawners. You'll see these as the big red X symbols on the default map, for each role. There are also blue Xs for xeno spawn locations (pretty sure spawners now use fancy sprites for their respective spawns) and the spawns for all latecomers on the arrival shuttle.(old/irrelevant, shuttles are not placed onto station maps anymore.) Stick in a spawn_late somewhere in your room for now.
(may change for redundancy reasons)
To actually test your map and be able to screw around in it as an admin, you'll have to compile it. The easiest way to do this is through Github Desktop, where you will open the repository in your external editor by clicking the "Open in Visual Studio Code" button. If this is not present, change your default editor in the options to Visual Studio Code. In Visual Studio Code, press F5 to both compile and launch the game. Full permissions are automatically granted as "localhost".
The best possible training is through experience. From here on out, you can make whatever you like, really. Copying the default map and working out how everything works isn't too hard and is fairly rewarding. You could just tweak the default one if you like. The first thing I made was a small shuttle - you can see this at the bottom. Just tweak and add stuff and you'll work out how almost everything works fairly easily. Poke around with both Github Desktop and StrongDMM. For explanations of wiring, piping, and atmos, ask away on the mapping channel of our discord or on the forums.
| san7890 (in a comment, uncommented by smithers) говорит: "About 90% of the stuff from this point onwards is outdated. I rewrote everything from this point in another HackMD (https://hackmd.io/@tgstation/ry4-gbKH5#Pre-Commit-Checklist) onwards. I need someone to explain how shuttles work to me (again) before I'm 100% done with that though, but I've struck through everything ported over (or that I don't really see why it should be ported over)." |
 |
SpaceSmithers говорит: "Already wiped the other 90%, except for the atmos part. Throwing the idea out there that maybe we could put atmospherics mapping into a dedicated subpage. Not a strong opinion, just an available option." |
Gas tanks and filters
Each station should have a full set of these - or at the bare minimum, one for N2, one for O2 and a third tank to filter dangerous gases into.
Each gas tank needs:
Outside: A tank computer and a gas filter to pick what gases will be filtered into it.Inside: A gas injector (input), a vent pump (output), a gas sensor and a specific turf.
The tank computer controls the input/output and receives data from the gas sensor.
The specific turf creates the gases that will be inside each tank - the gas canister is just for decoration.
Let's take a look at the MetaStation N2 tank:
Tank computer: /obj/machinery/computer/atmos_control/tank/nitrogen_tankN2 filter: /obj/machinery/atmospherics/components/trinary/filter/atmos/n2Gas injector: /obj/machinery/atmospherics/components/unary/outlet_injector/atmos/nitrogen_inputVent pump: /obj/machinery/atmospherics/components/unary/vent_pump/siphon/atmos/nitrogen_outputGas sensor: /obj/machinery/air_sensor/atmos/nitrogen_tankTurf: /turf/open/floor/engine/n2
These objects have all the neccessary vars preset and start switched on - you'll only have to edit the dir if neccessary.
Additionally, you'll want this type of gas mixer for the airmix tank (N2 + O2):
Air mixer: /obj/machinery/atmospherics/components/trinary/mixer/airmix
Shuttles
 |
SpaceSmithers говорит: "IMPORTANT: I don't want a repeat of the old guide; this is not the place to dump random shuttle code documentation. This is a mapping guide. If you want to document shuttle code, |
There are two types of shuttle docks:
Mobile ports will dock directly on top of stationary ports.
Sometimes listed as its own type of port, transit ports /obj/docking_port/stationary/transit are automatically generated in a dedicated transit z-level, so you don't have to worry about that.
Stationary Ports
For places like arrivals and departures, we will have to add a /obj/docking_port/stationary for each, and manually edit in some variables for them to work. It's a good idea to have an updated, pre-existing map open in your workspace to reference or copy.
Before we do anything, lets identify some of the variables we will likely be seeing.
dir: The direction of the port.- If a shuttle's mobile docking port direction is different than the stationary docking port's direction, the shuttle and all items on it will be rotated accordingly.
- This rotates the entire plane. Other variables, like
widthandheight, are relative to this direction. This means that on a docking port facing west or east (dir = 4 or 8 respectively),heightwill be horizontal on the mapping workspace, andwidthwill be vertical.
height: The size of covered area, parallel to dir.width: The size of covered area, perpendicular to dir.dheight: Distance in height from the (0,0) bounding box to the dock. More details can be found here.dwidth: Distance in width from the (0,0) bounding box to the dock. More details can be found here.name: A name string for the port. This name will be visible on shuttle consoles, Shuttle-Manipulator admin verb, and during debugging.roundstart_template: A template that will spawn on this port when the map initializes. Used on docks for arrivals, escape pods, and more.shuttle_id(formerlyid): Identification variable. Mandatory for certain ports.- IMPORTANT: For standard stations, you MUST use these exact strings for the listed areas, or else they will not function. Stub? double-check all instances of shuttle_id in case i missed some.
- Arrivals dock:
"arrival_stationary" - On-station dock for centcom ferry:
"ferry_home" - Emergency Shuttle Dock:
"emergency_home" - Cargo Dock:
"cargo_home" - On-station Whiteship dock:
"whiteship_home" - Auxiliary Base Construction:
"aux_base_zone"
- Arrivals dock:
- IMPORTANT: For standard stations, you MUST use these exact strings for the listed areas, or else they will not function. Stub? double-check all instances of shuttle_id in case i missed some.
A stationary port is strict with its width and height variables when deciding if a shuttle can dock there. They should generally be greater than or equal to the dimensions of the shuttle that wants to dock. If a shuttle is larger than the stationary port's dimensions, it will outright refuse to dock. When testing your map, debug/admin tools such as the Shuttle-Manipulator verb will be a tremendous asset.
The stationary ports for the labor shuttle, mining shuttle, public mining shuttle, and the auxiliary base zone each have their own, unique subtypes. These are presets and should not be edited, except for their direction.
Escape pods utilize two different stationary ports for each pod; one is a standard docking port with the roundstart_template to spawn the pod, and another that uses a unique subtype of stationary ports, /obj/docking_port/stationary/random. When the map initializes, the random ports are automatically teleported to a random spot in lavaland (or the icemoon if using the respective icemoon subtype). These spots are reserved for emergency pod launches when the station is on red or delta alert levels. Random ports need a shuttle_id for pods to dock, and generally use the following naming scheme: "pod_lavaland", "pod_2_lavaland", "pod_3_lavaland", and so on. Note that the non-random stationary ports that stay on-station do not have a shuttle_id set, and therefore do not accept return trips after the pod departs.
Most stationary ports, except for the arrivals shuttle, generally face the shuttle or face away from the thing the shuttle docks with. If you're unsure where to place the docks, its always a good idea to use another pre-existing map as a reference. Also remember that mobile ports park directly on top of stationary ports and will also rotate to adopt their dir.
Mobile Ports
The mobile port variables are quite different from their stationary counterpart. Lets go through the variables:
- The
width,height,dwidth, anddheightare all generated automatically, and should not be manually edited in. name: Name your spacecraft! Will be printed in consoles and also station-wide announcements if its an escape shuttle.preferred_direction: The direction the shuttle appears to travel in. Changes the parallax animation.port_direction: Relative direction of the docking port from the front of the shuttle. If you rotate the ship so that it points north, what direction will the mobile port be facing?
You should cover your entire shuttle with one or more proper subtypes of /area/shuttle, especially if its an escape shuttle with a brig on it. This ensures that everything works and moves properly. Otherwise, your shuttle may encounter unwanted errors or claim turfs within the bounding box that shouldn't be moving with your shuttle.
Some shuttles should be using specialized subtypes of the mobile docking port, like arrivals and emergency shuttles. Be sure to check these subtypes before settling with the generic one, or else they may not work as expected.
Dwidth and Dheight in more depth
In progress, a mix of old and new. Todo: Re-write section, create a better visual 2x2 table diagram displaying all 4 directions. Focus more on the generic diagram and turn the metastation blurb into a shorter example piece.
dwidth/dheight is the offset of the docking_port obj from the (0,0) bounding box corner. In dir == 1 (north) 0,0 is the bottom left corner? This changes for each direction, For example when dir is 2 it's the upper right corner. so dwidth and dheight identify where the bounding box starts relative to the docking port obj whereaswidth and height determine the actual width and height of the bounding box
Note: We count step 0 as a tile, so a height and width of 9 is actually 10 tiles (tile 0 to tile 9)
Here is an example for the north facing shuttle dock direction - you can rotate this image to determine where the offset is for each other cardinal direction Файл:ShuttleBox.png
 |
Lets take a look at Metastation's arrivals dock. You can see the area it covers with its width and height variables. Please note that since the port is rotated to the west, width, height, and even the origin point (0,0) are all rotated as well. In the image, you can see how dwidth is measured from the (0,0) tile. The dheight variable goes unedited in this case, because the dock is 0 tiles away height-wise relative to the (0,0) point, and the default value is already 0. |
Other files
If you are adding a map to the game, you need to ensure it has a JSON file under _maps, and is included in the maps config file.
| san7890 (in a comment, uncommented by smithers) говорит: "I'm going to keep it 100% with you, I don't even know why we have this section. I didn't bother adding it to the modern guides because I don't even know the usecase of it... feel free to leave it here if you want, but I don't know of a usecase." |
 |
SpaceSmithers говорит: "I'll look more into it after im done the shuttle section. Update 11/17: They appear to be mandatory for multiz maps (as described below, actually), and I think the map rotation config relies on these existing, but not 100% sure on that." |
Multi-Z
 |
SpaceSmithers говорит: "Mapping Reference Guide has a nifty section on Multi-Z. I'll copy the information over eventually." |
Multi-Z is a feature which allows a station map to have multiple Z-levels layered on top of each other, behaving as a single station with multiple floors. This feature is currently in use on the Tramstation and IceboxStation maps. A station's multiple levels can be bundled into one map file, or in several seperate files. The traits section of the map configuration json tells SS13 how to link the maps together.
If you are building station rooms on a lower Z level, ensure that a floor of some type is mapped on the Z level above the room. You can check the coordinates in the mapping editor to ensure you floor over the correct dimensions of the room. When running the server in Dream Daemon to test the map, you can go to the Debug tab and hit show debug verbs, go to Mapping tab and hit Show ATs, if the list is empty, you are good.
Earlier versions of multi-z did not require a baseturf to be defined under each z-level's traits in the config json. Each level must now have a baseturf set.
The maploader will not load and link a map file without areas or turfs defined. An empty space (nothing but baseturf) map will runtime. If you are adding a Z-level to an existing map, be aware of this.
SS13 will cache a map's configuration json file in data\next_map.json. If you alter a map's configuration json locally, you must also clear this file by using the change-map verb in game, deleting the file, or replacing it with your updated json file.
